Getting Started
OSS IQ helps developers and coding agents answer three questions about every package:
Should I add it? Update it? Refactor it out?
Before a new dependency lands, OSS IQ checks whether the package and version is healthy, maintained, and appropriate for your project, keeping deprecated, outdated, or too-fresh releases out. For the dependencies you already have, it shows when and how to upgrade, verifies the upgrade is compatible with the rest of your tree, and supplies agents such as Claude and Codex with the validated context they need to make the change safely.
This page takes you from nothing to a first scan, then through each way of working: coding agents, the CLI, and reports and exports.
Install OSS IQ
Run OSS IQ without installing it, from PyPI or from npm:
uvx ossiq --version          # PyPI, through uv
npx @ossiq/cli --version     # npm: a native binary, no Python needed
To install it permanently, pick one channel:
Channel |
Install |
Needs |
|---|---|---|
PyPI |
|
Python 3.11+ |
npm |
|
Node.js only |
Docker |
|
Docker |
The npm package ships a self-contained binary for these platforms:
OS |
Architecture |
|---|---|
macOS |
arm64, x64 |
Linux (glibc) |
arm64, x64 |
Windows |
x64 |
On Windows on Arm and on musl-based Linux such as Alpine, install from PyPI.
The rest of this page writes ossiq. Without an install, type uvx ossiq or npx @ossiq/cli
instead.
Log in to GitHub
OSS IQ reads repository activity from GitHub to judge maintenance health. A full scan needs hundreds of API requests, and GitHub allows 60 an hour without a login and 5,000 with one.
Start the login:
ossiq auth loginOpen https://github.com/login/device, enter the code that the command prints, and approve OSS IQ.
The command confirms the login and exits. It keeps the token in your operating system’s secret store: macOS Keychain, Windows Credential Manager, or Secret Service on Linux. The token has no scopes, expires after 8 hours, and refreshes by itself.
Note
On macOS, the first run after each upgrade asks for Keychain access. Click Always Allow.
CI runners and containers have no secret store, so set OSSIQ_GITHUB_TOKEN there instead.
Log in to GitHub covers CI, coding agents, logging out and
troubleshooting.
Your first scan
Point ossiq at an existing Python or JavaScript project, and OSS IQ detects the manifest:
ossiq status path/to/your/project
Supported manifests are the ones your package manager already writes: for npm, package.json with package-lock.json; for Python, pylock.toml, uv.lock, or classic requirements.txt.
The report gives you a project-level risk score, then breaks it down per package into security signals (vulnerabilities) and maintenance signals (activity, overhead, health):
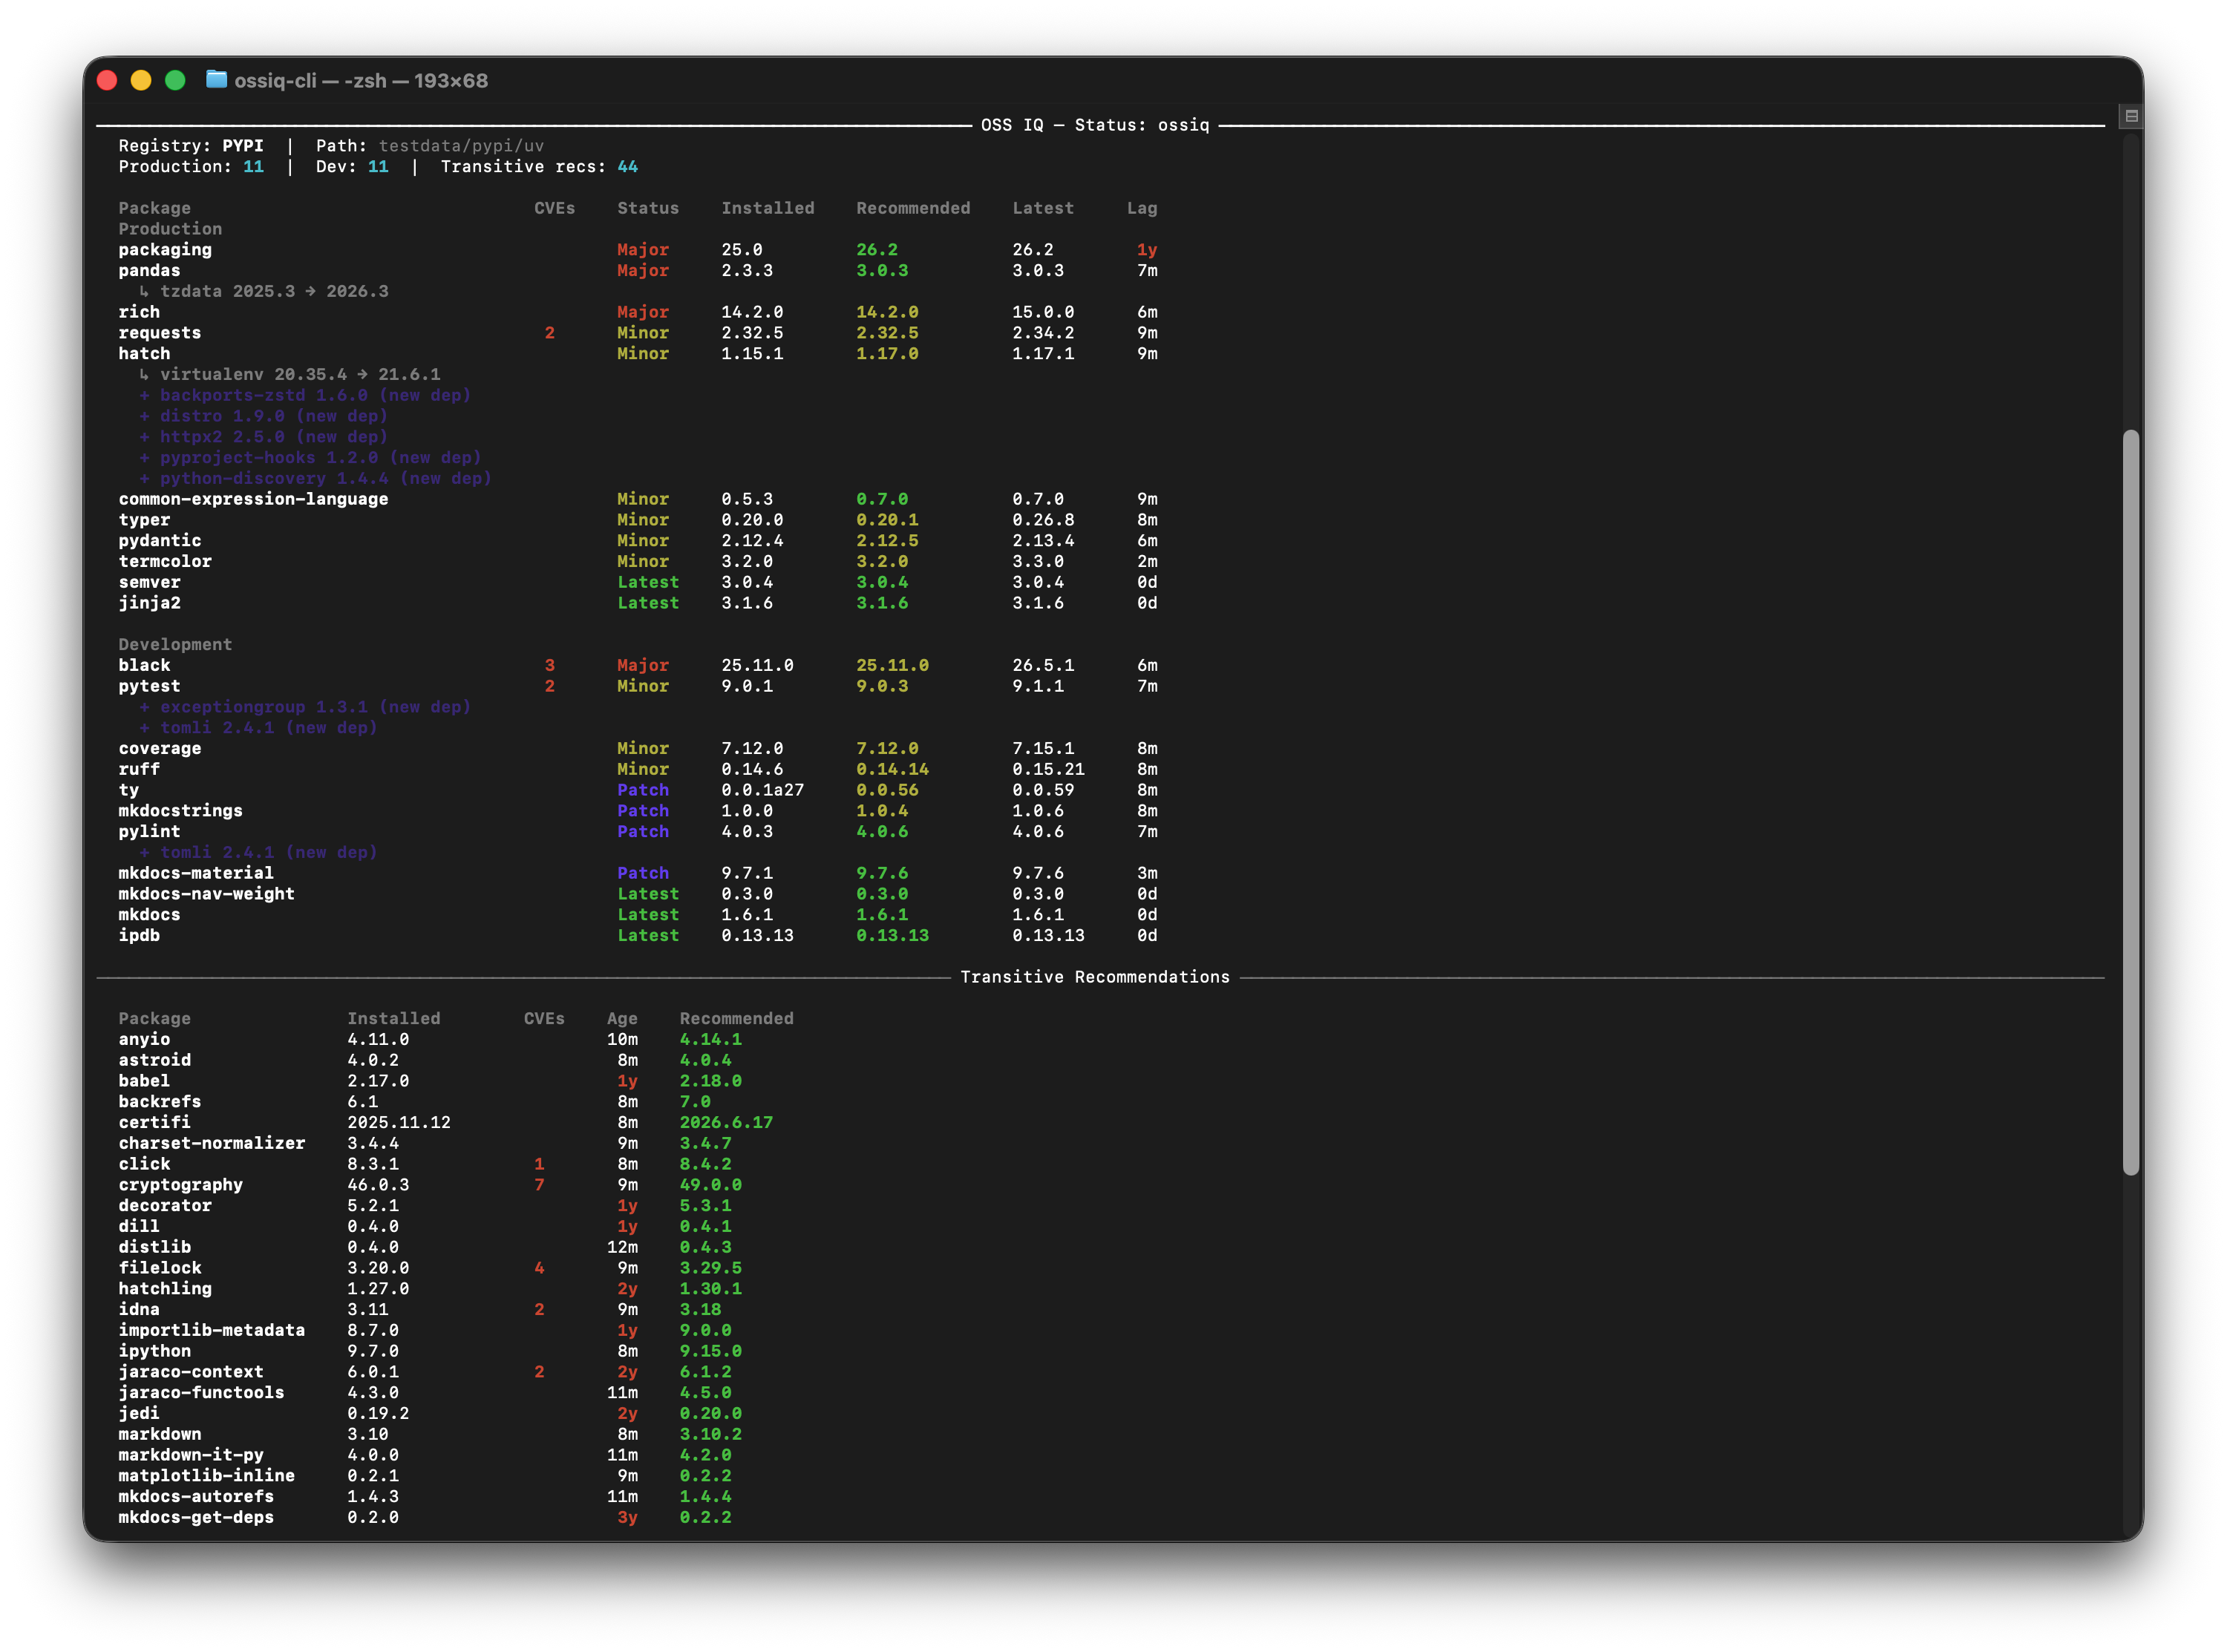
Every table, column, and status marker in this report, including the Transitive Recommendations, Peer Constraint Status and the unresolved-peer rows, is documented in Reference → Console Reports.
Coding agents
Give Claude Code, OpenAI Codex, or GitHub Copilot the same health check before they add or
upgrade a dependency. ossiq install skills writes a SKILL.md and registers a local stdio
MCP server (ossiq mcp):
# Install for all three tools
ossiq install skills

# Or target a single tool
ossiq install skills claude
ossiq install skills codex
ossiq install skills copilot
Tool |
Skill location |
MCP server |
|---|---|---|
Claude Code |
|
registered in |
OpenAI Codex |
|
registered in |
GitHub Copilot |
appended to |
- |
The skill and the MCP server run OSS IQ the way you ran install skills:
npx @ossiq/cli install skills gives npx commands, and uvx ossiq install skills gives uvx
ones. To choose yourself, pass --via uvx, --via npx or --via ossiq; see
How the skill runs OSS IQ.
The command stores no GitHub token. The MCP server uses your GitHub login;
without one, the agent shows you a login code and retries after you approve. Re-running
install skills is safe: it merges into existing config rather than overwriting it.
Once installed, the agent has two read-only tools:
Tool |
Answers |
|---|---|
|
Should I add this package, and at which version? |
|
Which existing dependencies should I bump, and in what order? |
Both return the same compact decision the CLI produces with --format agent: a next_action per
package (install, install with caution, do not install when adding; Update Immediately,
Check Release Notes, Check for the Fix, Consider alternative, Find alternative when
updating), the recommended version, CVEs, and supply-chain warnings.
ossiq info requests --format agent
For exactly which files are written, and how to run the integration from a local checkout with
--dev, see Reference → install skills.
The CLI workflow
ossiq status              # dependency health for the whole project
ossiq status --full       # every package, every column
ossiq status --update-strategy security   # CVE-affected packages only
ossiq info sphinx         # one package: drift, CVEs, tree path, peer requirements
ossiq add requests        # quality-gated install of the recommended version
ossiq plan                # what the solver would change - read-only
ossiq apply               # execute the plan, with rollback on failure
Each takes an optional project path (default: .) and --registry-type npm|pypi to
disambiguate a polyglot repo.
Package details
ossiq info sphinx
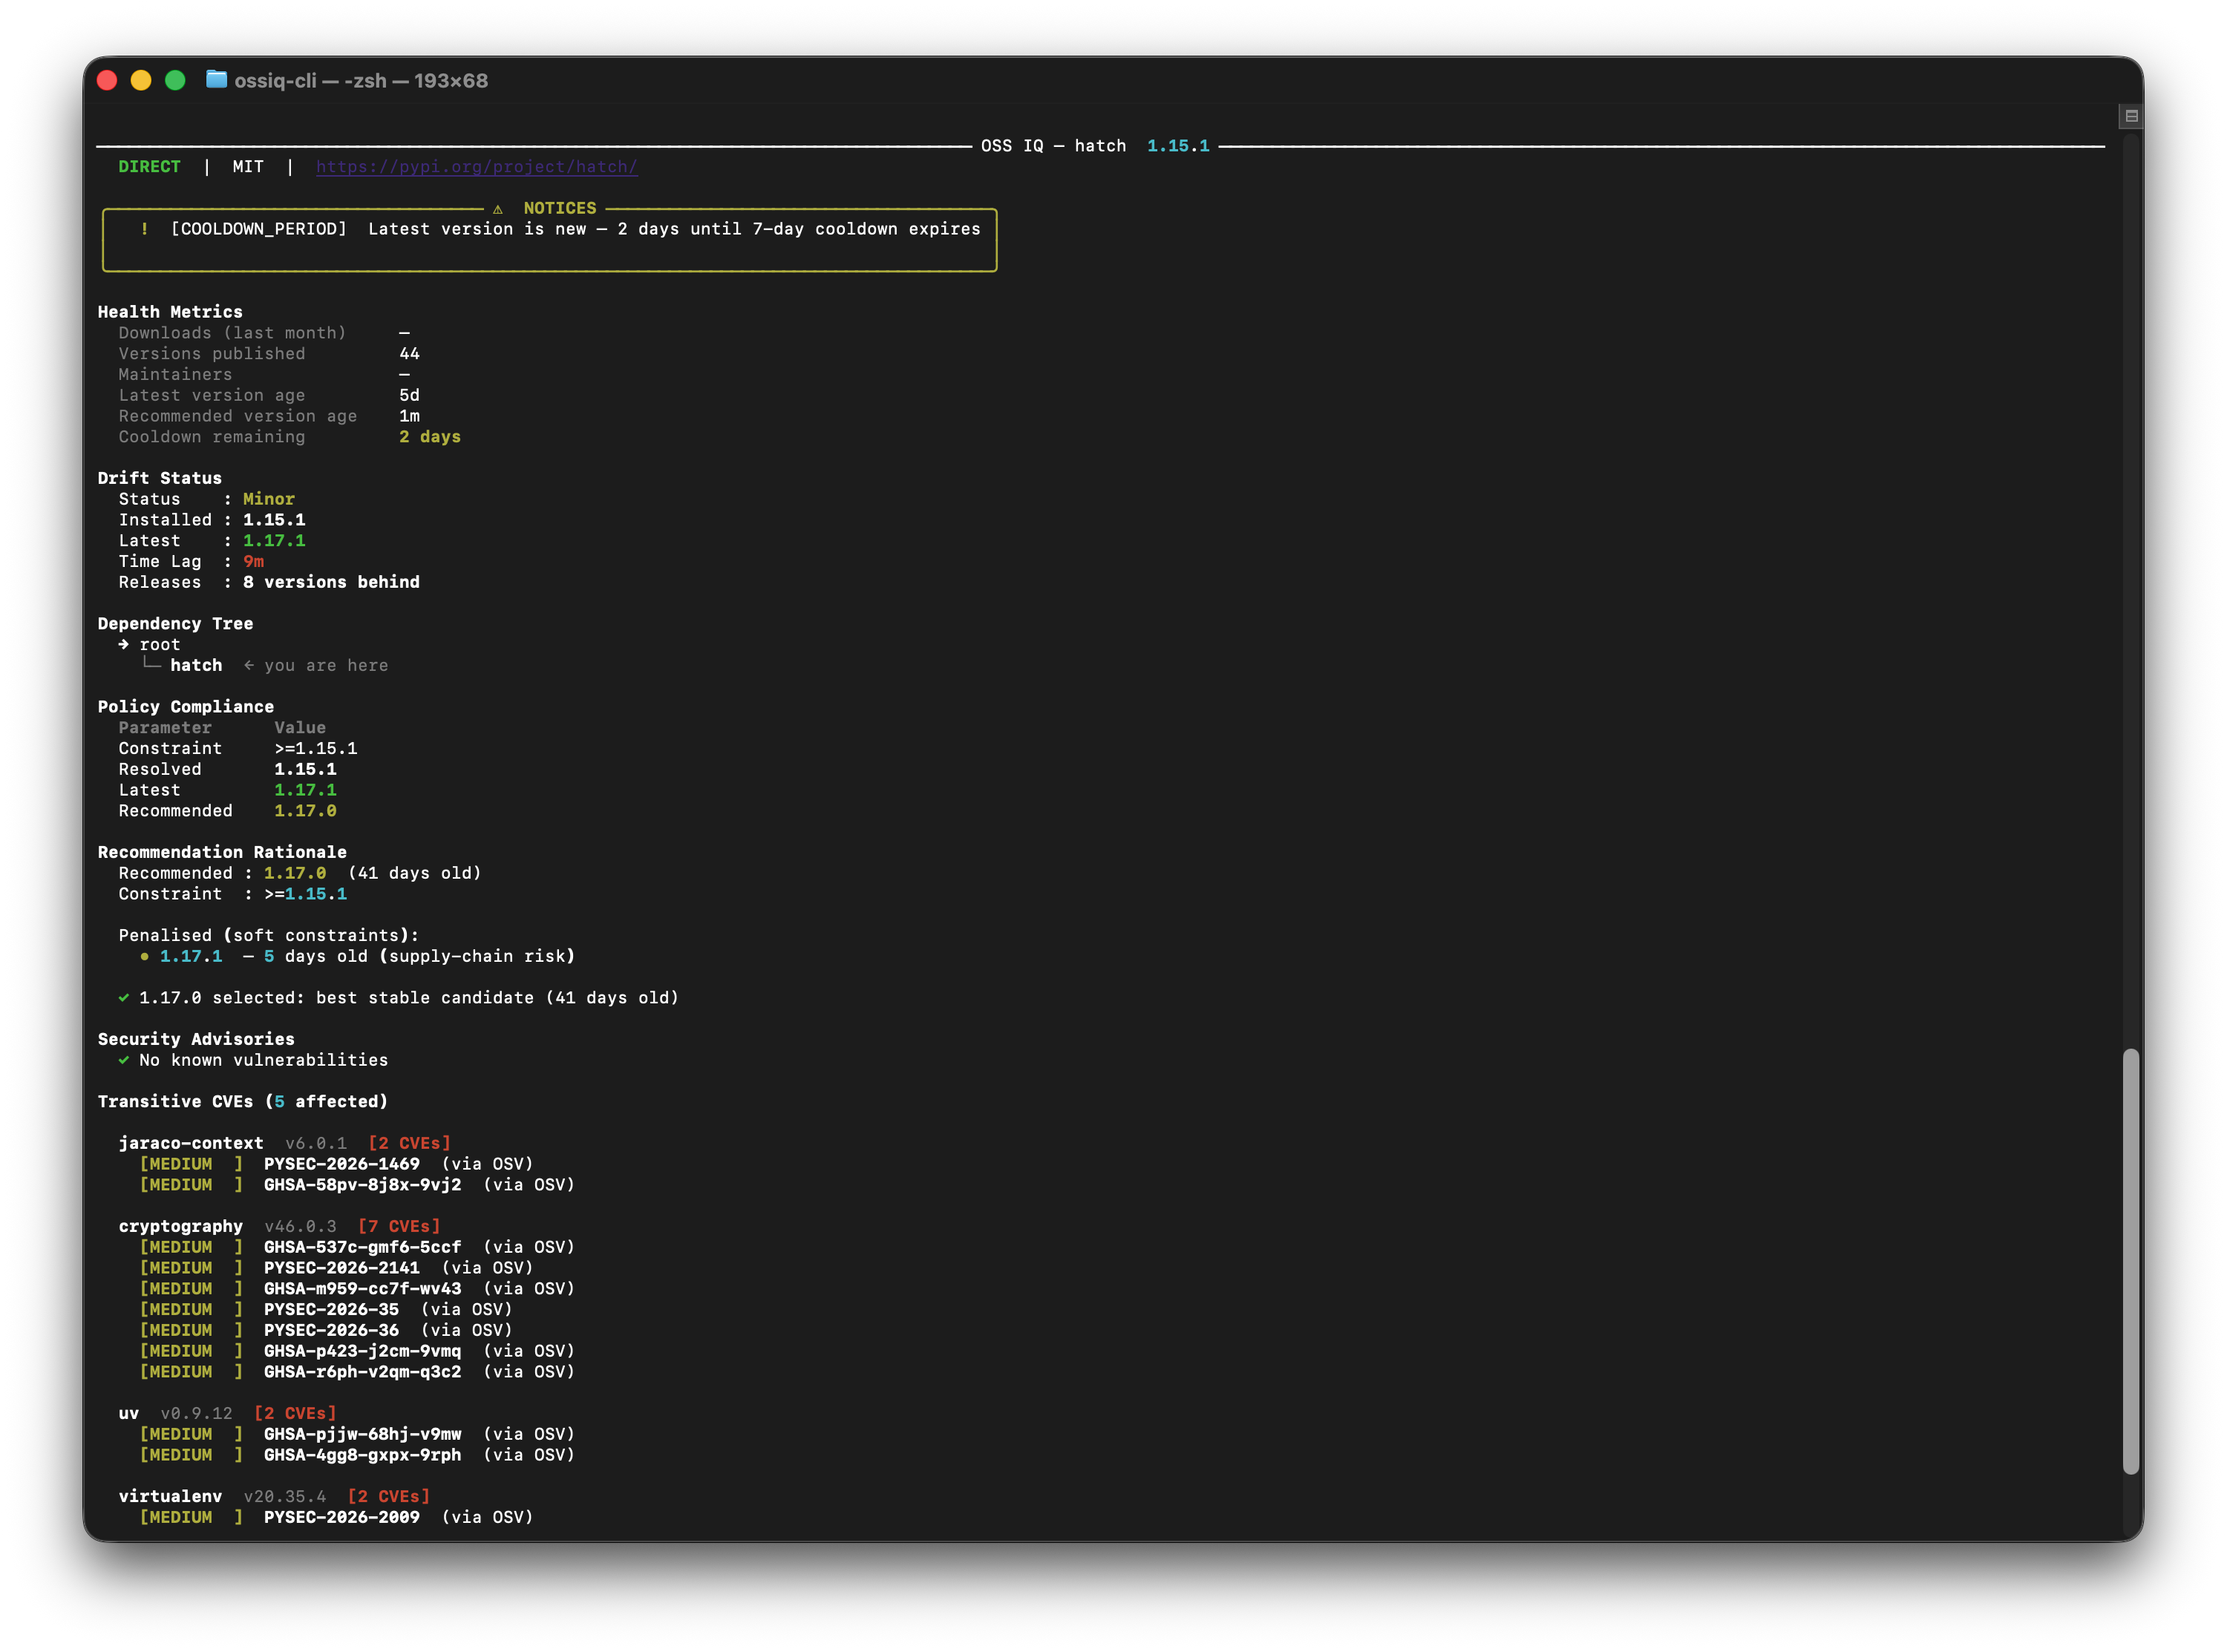
The section-by-section breakdown of this report - drift status, policy compliance, recommendation rationale, peer requirements, and transitive CVEs - is in Reference → Console Reports.
Gated package add
ossiq add is a quality-gated alternative to running uv add or npm install directly.
Package managers install the newest version that satisfies your constraints; ossiq add
installs the recommended one. It runs the same analysis as info, shows drift status, CVEs,
transitive vulnerabilities, and maintainer signals before touching a file, and blocks packages
flagged as critically unhealthy unless you pass --force.
A package its registry has retired counts as critically unhealthy. ossiq add left-pad stops and
quotes npm’s own note (“use String.prototype.padStart()”), which usually names the replacement.
The same holds for a package PyPI marks deprecated, archived or quarantined, and for a
deprecated release you request with --version. When you add a package that is otherwise live,
ossiq add never recommends one of its deprecated releases.
On npm projects the install runs with --ignore-scripts, the same as ossiq apply, so the new
package cannot run code during the install. A package that needs a postinstall step (a native
build or a downloaded binary, as with esbuild, sharp or prisma) needs npm rebuild <name> afterwards.
# Check health signals and install the recommended version
ossiq add requests

# Pin an exact version yourself (bypasses the solver recommendation)
ossiq add requests --version 2.31.0

# Override critical-warning blocks (use with care)
ossiq add requests --force
Plan and apply updates
ossiq plan shows what the solver recommends without touching any files; ossiq apply
executes those changes and rolls them back if the install fails. Every flag is accepted by both,
so a plan is a faithful preview of the matching apply.
ossiq plan                    # read-only preview
ossiq apply                   # prompts for confirmation
ossiq apply --update-strategy security --yes  # patch CVE-affected packages only, unattended
Before recommending a version, the solver simulates its full transitive cascade, falls back to the
next-best candidate when the top one would conflict, and holds back releases younger than
--cooldown-period (default: 7 days) unless they fix a CVE in an installed version. The solver
resolves in a single pass against your current lockfile, so re-running plan after apply can
surface further updates; repeat until it reports none. Full rules are in
Reference → Update Solver, and every flag is in
Reference → Plan and apply options.
Reports and exports
HTML report
Generate a single self-contained HTML file:
ossiq html --output report.htmlOpen
report.htmlfor the table view of your dependencies: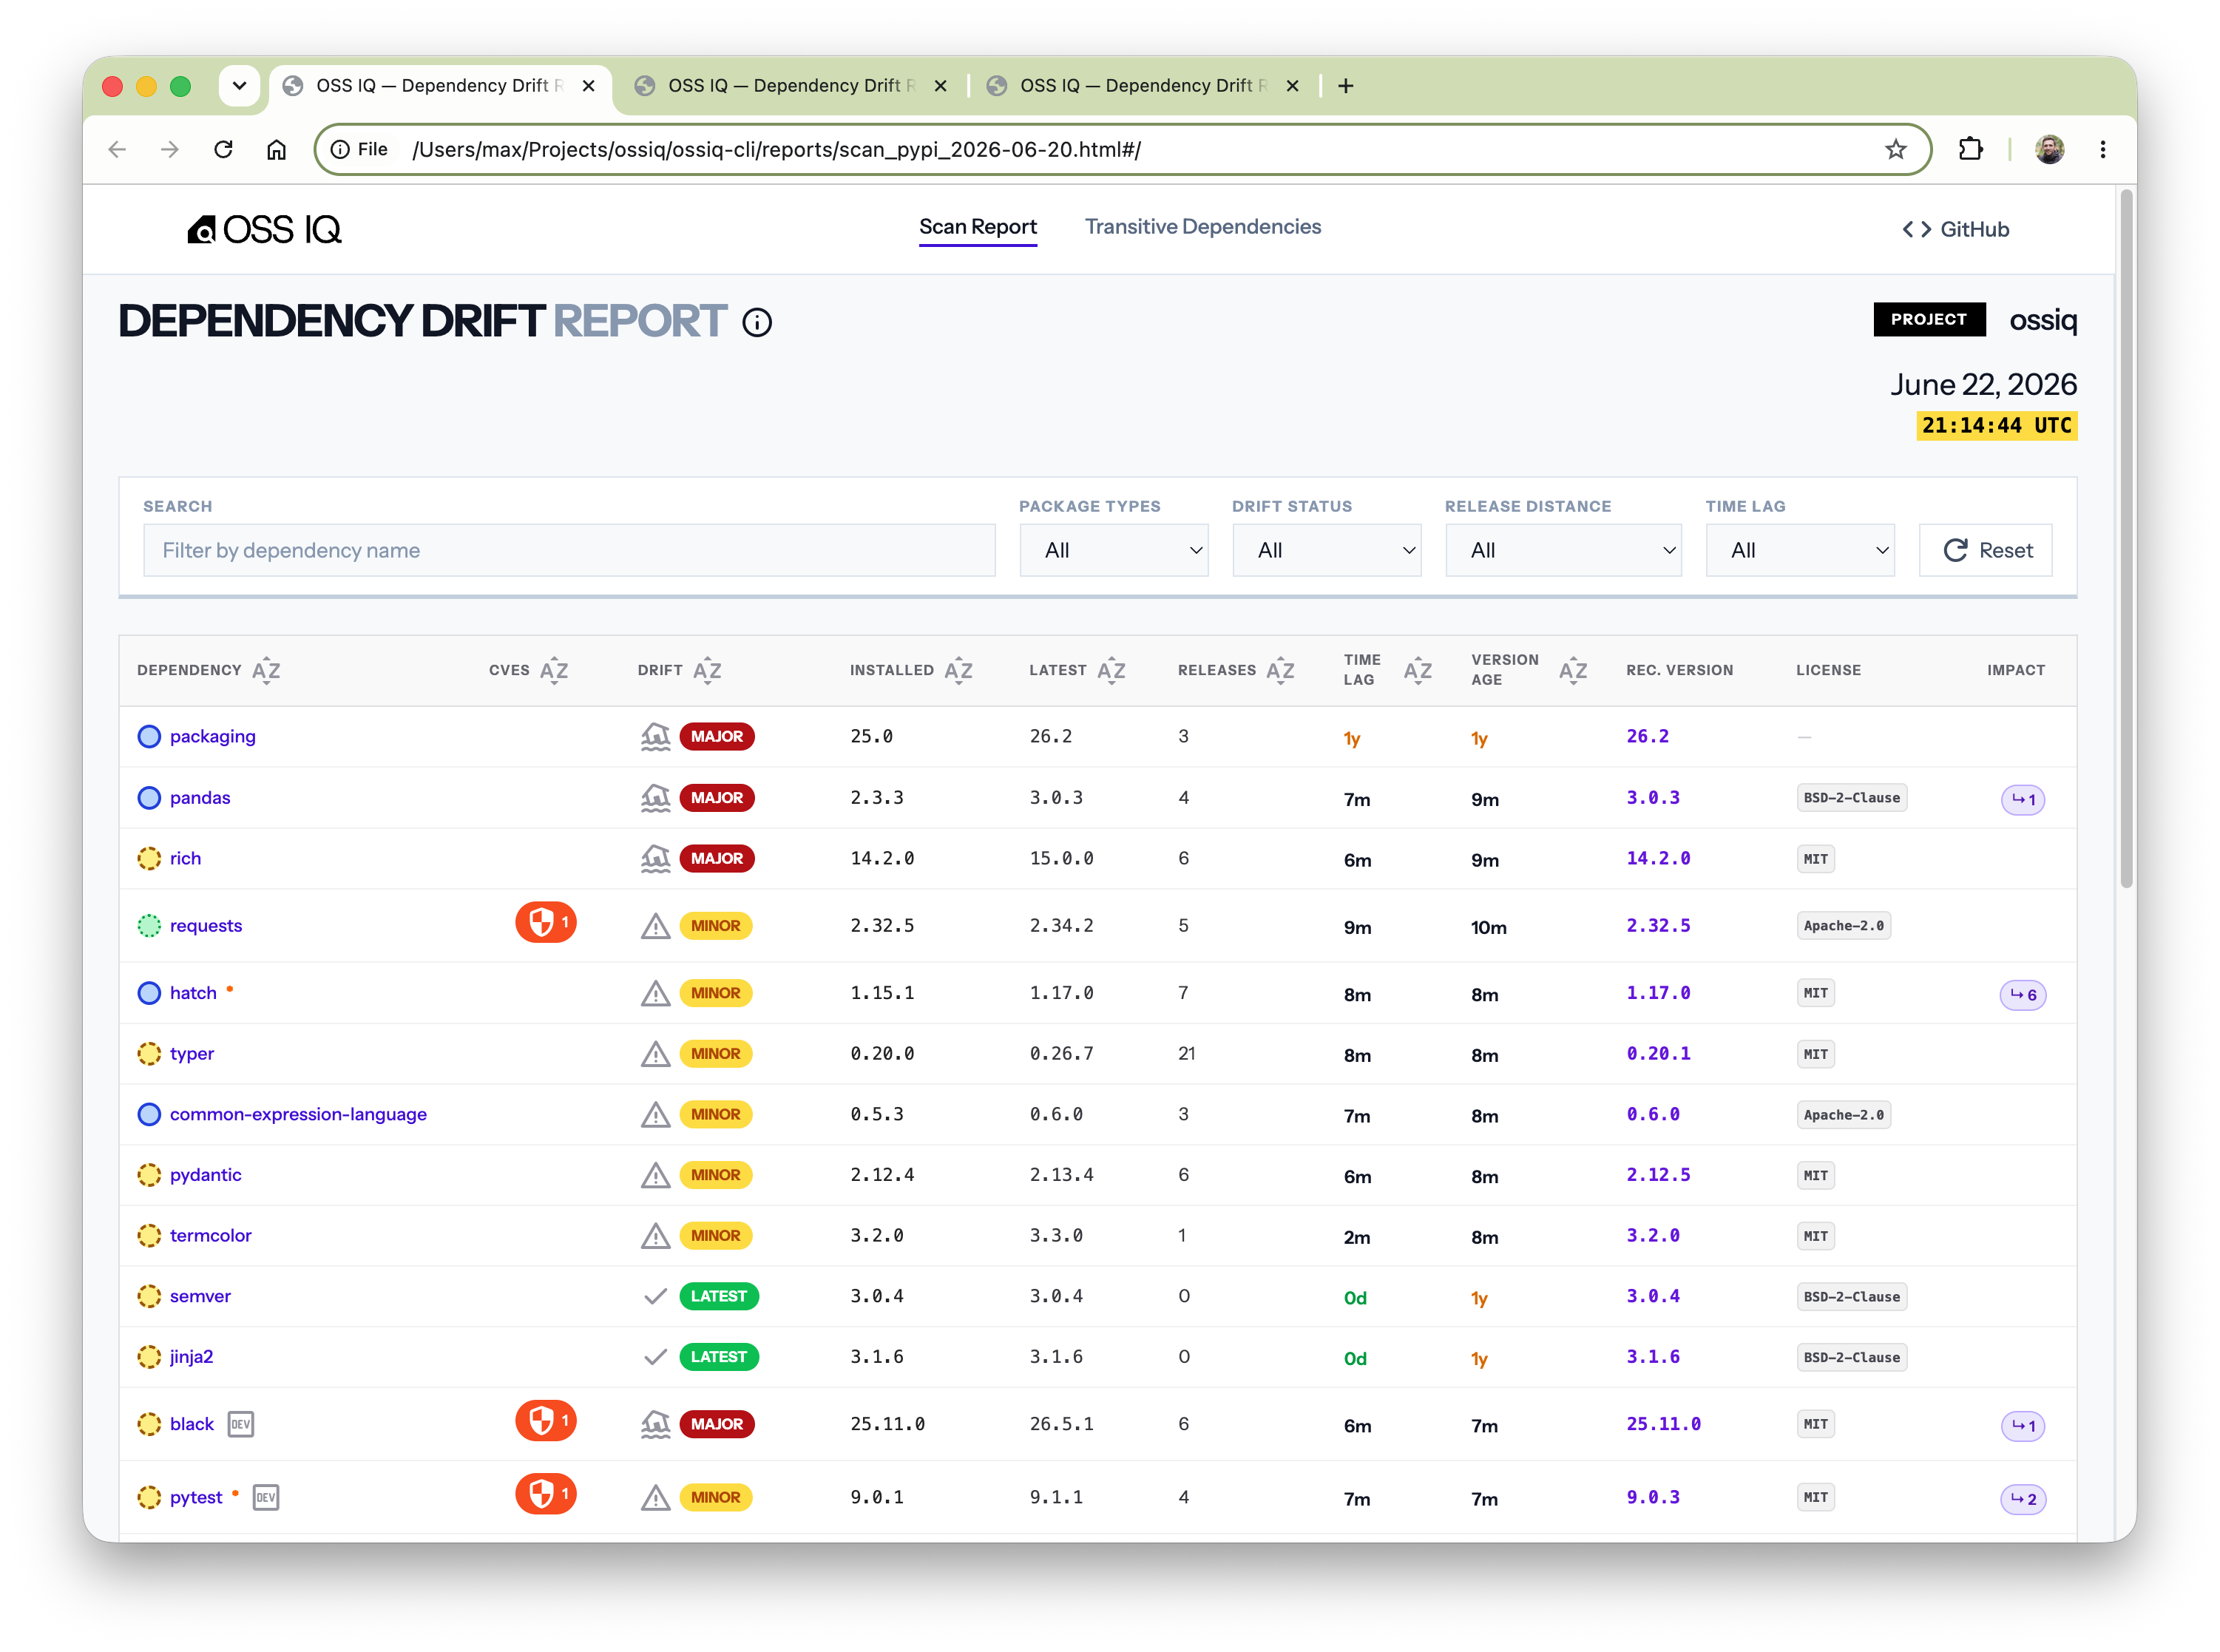
Click the Transitive Dependencies tab at the top:
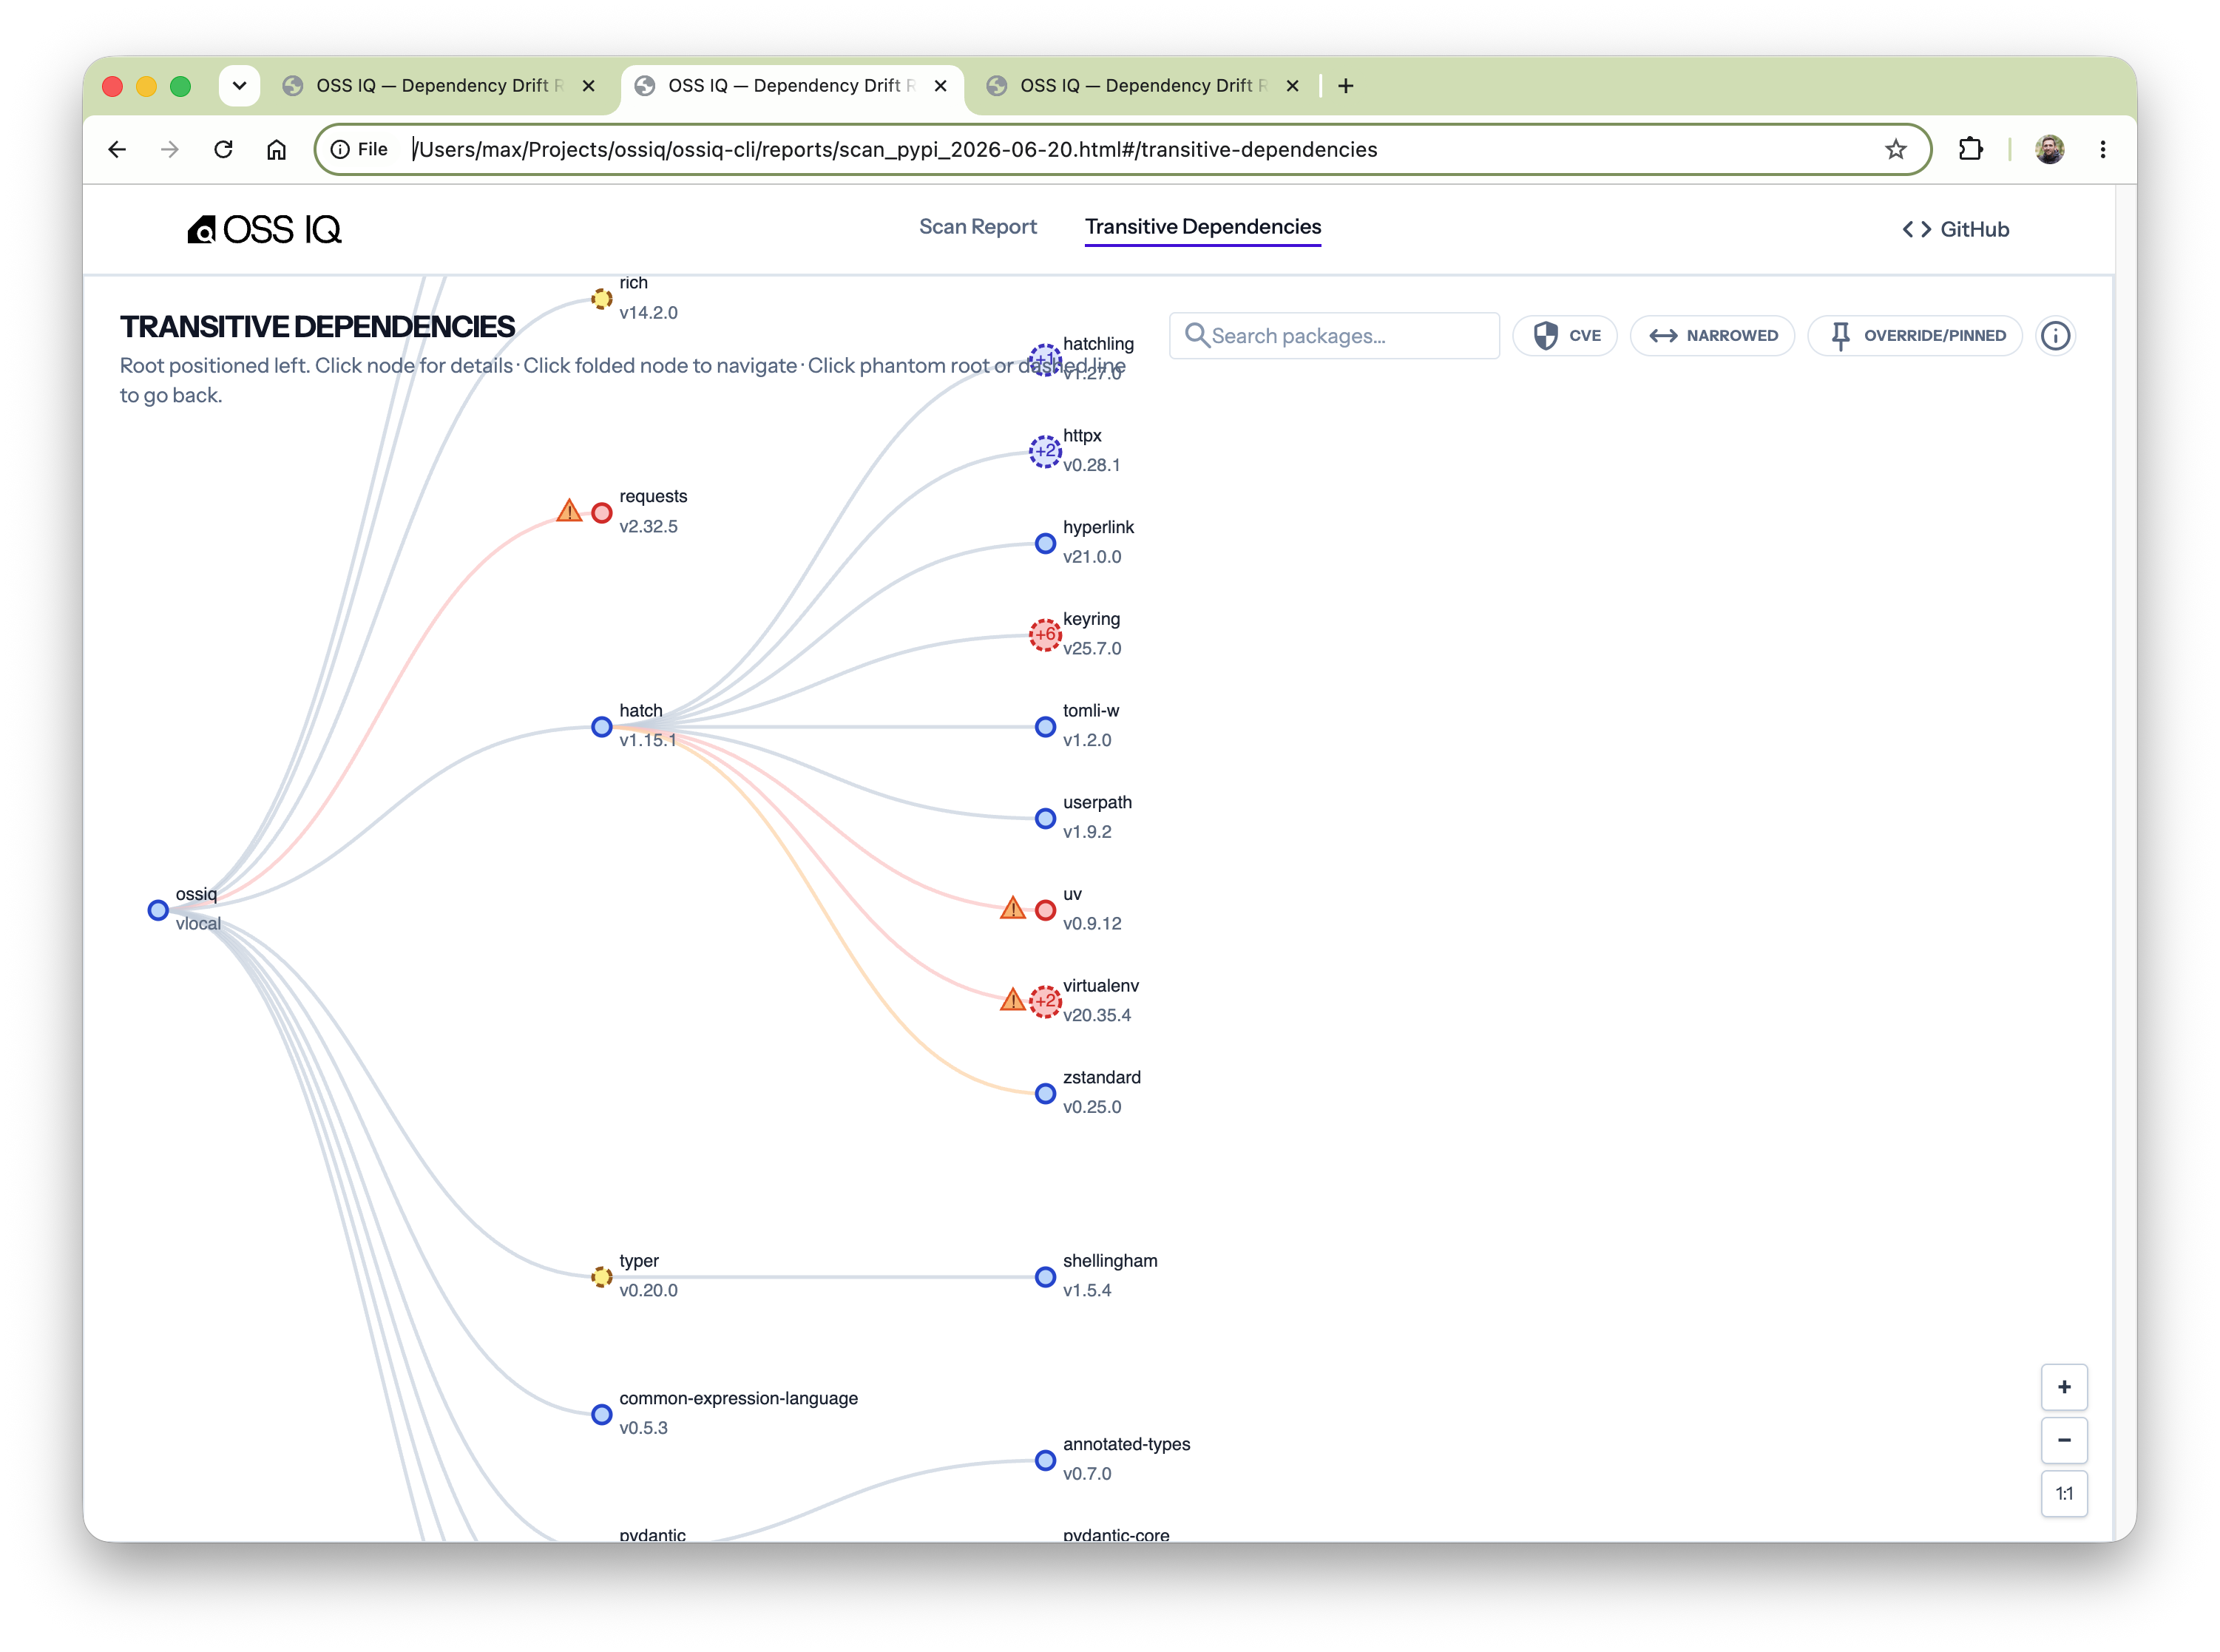
Click a dependency node (blue circle) to read its details:
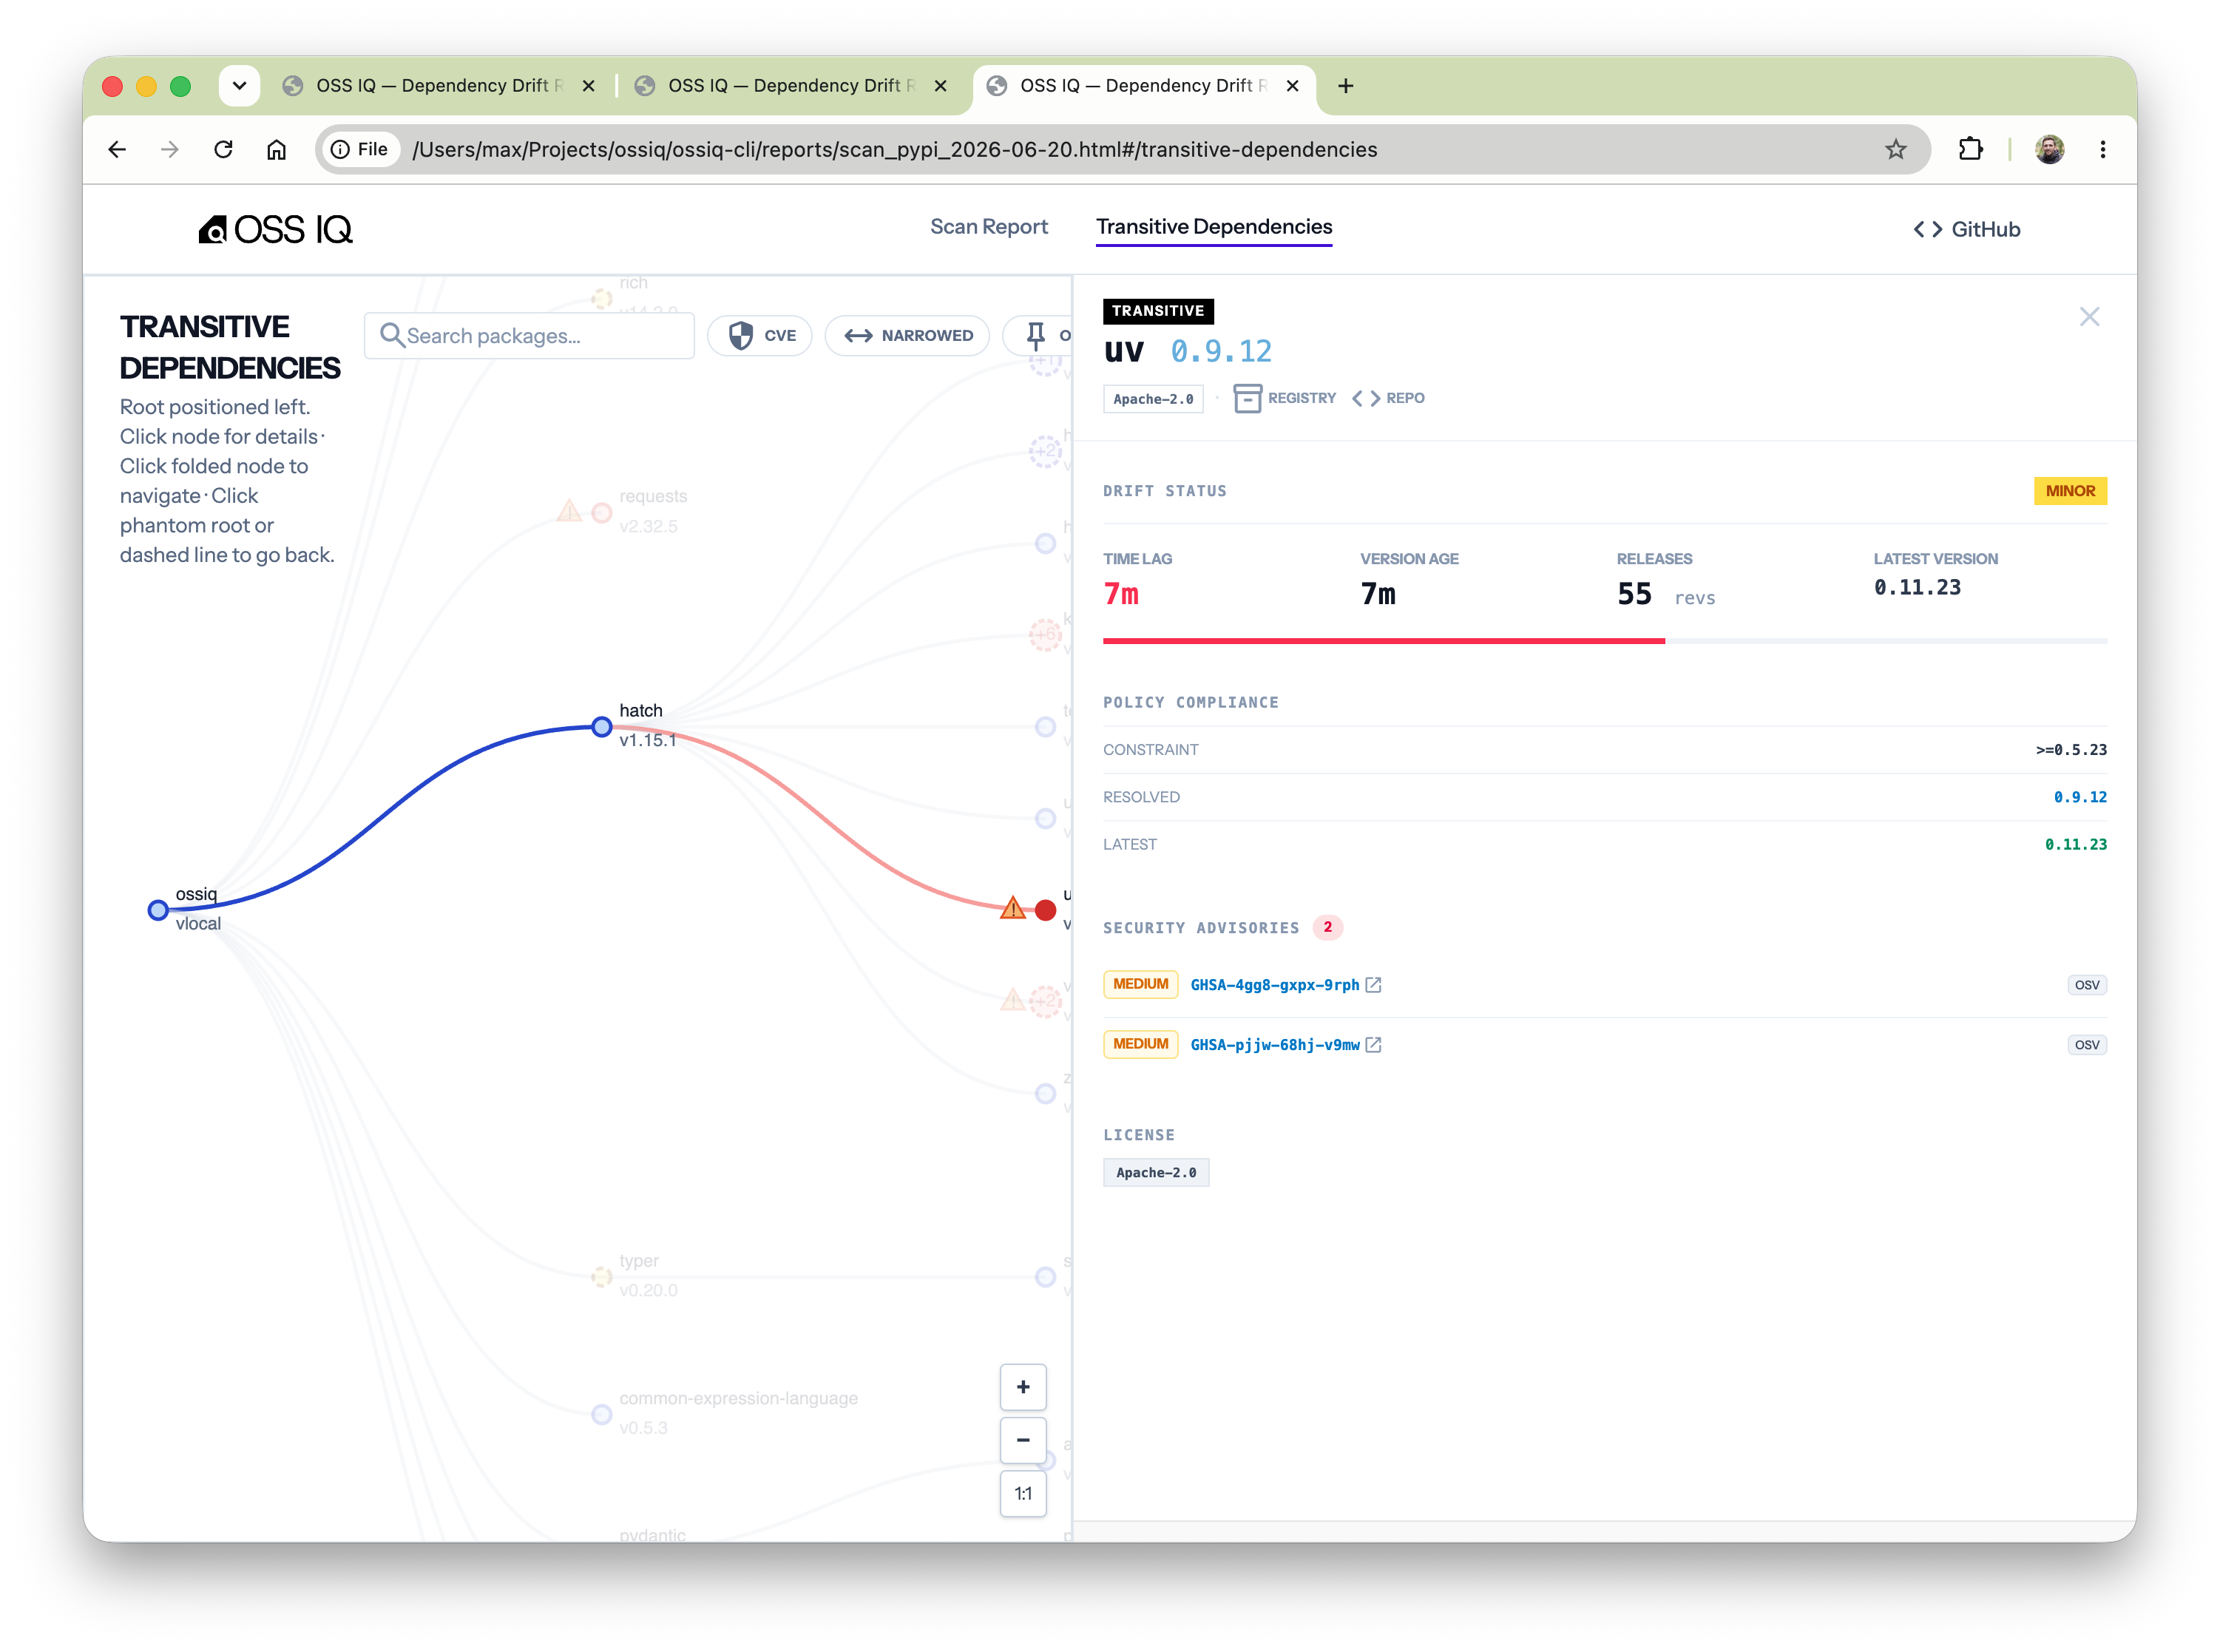
Here the report tells you that vue is resolved at
3.5.38, which is also the latest published version.
This is the view for planning work rather than fixing one package: sort by drift or severity, drill into any dependency, and decide what to read release notes for before it enters the backlog.
JSON export
# One JSON document
ossiq export --output=./scan_export.json .
The export carries a schema_version, which you can pin with --schema-version: within a
version, fields are never renamed or removed, so a metric you gate on in CI today keeps its
meaning tomorrow. See
Reference → Outputs and
Reference → Export Schema Stability.